Home Blog Page 62

How Coffee Bloom Affects Extraction: The Science Behind the Bubbles

When you brew coffee and see that attractive puff of bubbles at the start what is known as the coffee bloom it’s not merely aesthetic. That initial fizz is a crucial component of the extraction. So, what does bloom do to the way your coffee tastes?

Let us deconstruct the physics of coffee bloom and how knowing about it will help you extract the optimal flavor from your brew.

What’s Really Happening During the Bloom?

When you first pour hot water over freshly ground coffee, it releases trapped gases—mostly carbon dioxide (CO₂)—from the coffee. The gases formed during roasting and are stored in the beans until you grind them. When the CO₂ is released, it creates bubbles and expansion: the coffee “blooms.”

This is important chemically since CO₂ resists water flow. If not removed before complete brewing, it will repel water and lead to uneven extraction. Uneven extraction normally translates to sour, underdeveloped, or flat-tasting coffee.

Why Extraction Matters

Extraction is the process by which water extracts flavors, oils, and substances from ground coffee. For a balanced cup, this needs to be even and complete. This is how blooming assists:

Reduces resistance: Allowing CO₂ out early, water can then flow freely and access all coffee particles on equal terms.

Improves consistency: Less gas means there are fewer air pockets disrupting flow, so the saturation is even.

Enhances flavor clarity: Proper blooming permits the extraction of the bright acids first, followed by body and sweetness, in a layered flavor.

Without bloom, water can channel through some grounds and over-extract others, creating harsh or muddled flavors.

Brewing Methods Where Bloom Impacts Extraction Most

Certain brewing methods more directly benefit from blooming:

Pour-Over (e.g., Hario V60 or Chemex): The bloom stage controls how evenly the coffee bed becomes saturated. Without it, there’s a risk of channeling.

French Press: Blooming pre-saturates grounds to aid in even immersion during steeping.

AeroPress: In recipes with blooming steps, you reduce trapped gas that can influence pressure or flow.

Even some automatic drip machines feature “pre-infusion” settings that mimic blooming—proof of its necessity.

How to Bloom for Better Extraction

If you’re serious about your cup, do the following when blooming:

Use freshly roasted coffee beans – ideally within 2–3 weeks of roasting.

Grind just before brewing to keep trapped gases intact.

Add water slowly – about twice the weight of your grounds. Pour gently and evenly.

Wait 30–45 seconds before continuing. This allows for complete degassing.

Continue brewing normally, knowing now that your extraction will be more even.

Its impact on extraction is enormous

Coffee bloom is a small step in the brewing process, but its impact on extraction is enormous. It sets the stage for hot water to interact correctly with coffee grounds and leads to better flavor and consistency in every cup.

So the next time you’re brewing, especially with manual methods, don’t skip the bloom.

Coffee Accessories on Amazon

Espresso Tampers 101: Why This Small Tool Makes a Big Difference

I remember when I first bought my espresso machine. I really believed I had everything planned out: the beans, my grinder, and my trusty machine. But I could never get my shots to feel just right.

So, what happened? I got a new tamper.

The basket was a bit too big, and I just couldn’t keep a steady squeeze on it. When you’re getting serious about espresso equipment, make sure you don’t forget the tamper. It’s a small thing, but it’s really important for making coffee that tastes like it came from a nice café, right in your own kitchen.

Let’s figure out what’s suitable for you.

What Does a Tamper Actually Do?

A tamper basically just presses things down. It’s a simple tool, usually with a flat, heavy bottom and a handle, that you use to pack stuff tightly. It pushes the material together, getting rid of air pockets and making it more solid.

When you tamp, you’re just pressing the coffee grounds in your portafilter into a nice, flat “puck.” This is what gives us the needed resistance to handle 9 bars of water pressure.

  • Resistance: A good tamp makes it harder for water to get through the coffee. This stops it from rushing through too fast (under-extracted).
  • Even Flavor: It makes sure everything gets flavored just right, so each sip tastes balanced.
  • Preventing Channeling: If your coffee puck isn’t perfectly level when you tamp it, the water will find the easiest path, rushing through those weak spots and messing up your whole shot.

Tamper Size: Why Precision Matters

Tamper diameters are typically around 49mm to 58.5mm. This is one of those specs we really need to nail.

  • Home Machines: For brands like De’Longhi or Breville/Sage, you’ll typically find portafilter sizes are either 51mm or 54mm.
  • Prosumer Machines: For commercial machines (like Gaggia, Rocket, or ECM), you’ll typically find that the baskets are 58mm.

Important: It’s a good idea to measure your basket’s size before you buy anything else for it. If your tamper is too small for the basket (like a 51mm tamper in a 58mm basket), you’ll end up with grounds around the edges that don’t get pressed down. This usually makes the coffee taste sour.

Flat Base vs. Convex Base: Which One To Use?

  • Flat Base: This makes sure your puck is totally flat. This is the go-to if you want true accuracy, which is why you see it so much in prosumer kitchens and cool coffee shops.
  • Convex Base: This is just a little bit curved, kind of like it’s got a small bump. This pushes the coffee to the edges, which might help seal the puck if your basket is tapered.

The Bottom Line: If you’re a home barista, a Flat Base is usually your best bet unless you have a strange basket situation.

Handle Ergonomics: Comfort Affects Consistency

It might seem like a simple thing to tamp your coffee grounds, but if you do it wrong every day, you could end up with wrist strain (what some folks call “Barista Wrist”).

  • Material: Wood feels good and warm. Aluminum gives you that precise feeling. Rubber is all about the grip.
  • Balance: Having a heavy base and a light handle makes it feel much more stable than if the tamper were top-heavy.

Make sure the handle fits nicely in your hand. You want your tamper to feel just right, like it’s a natural part of your arm, not some awkward thing you’re fighting with.

Should You Switch to a Calibrated Tamper?

Calibrated tampers actually have a spring inside them. They click, or just stop squishing down, when you’ve hit a certain pressure (usually around 25-30 pounds).

They are really good for:

  1. Beginners who aren’t quite sure what “30 lbs of pressure” actually means.
  2. Consistency so all your shots look right together.
  3. Peace of Mind to prevent over-tamping or under-tamping.

They’re not a must-have, but they definitely help you relax, especially when you’re really trying to get things perfect.

Recommended Espresso Tampers

TamperBest ForNotes
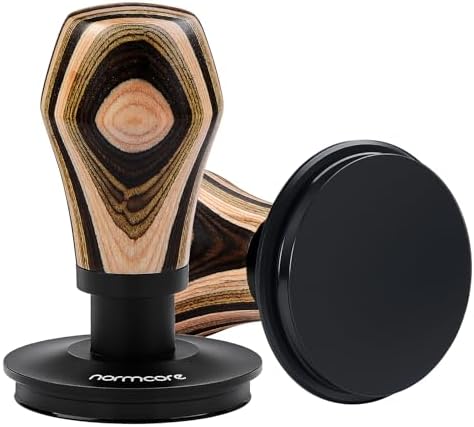
Normcore V4 CalibratedBeginnersAdjustable pressure springs and levels itself.
Matow Dual-HeadSmall SetupsBundles a distributor and a tamper all into one tool.
Motta 58.4mmProsumersHeavy, flat base with that classic Italian design.
LuxHaus CalibratedBudgetStraightforward, dependable, and simple to use.

The Bottom Line

You might not really think about your tamper very often, but a bad fit or an uneven one can seriously mess up your espresso without you even realizing it. If you pick the correct size and shape, your tamper will make each tamp consistent, which means your espresso shots will taste way better.

When you’re brewing another one, try asking yourself: Is the pressure even? Is my puck straight? The answer is in your hands.

Coffee Accessories on Amazon

How to Choose the Right Coffee Grinder for Your Brewing Style

If you’ve ever brewed coffee at home and felt something was off, chances are your grinder might be the culprit. Choosing the right coffee grinder isn’t just about price or looks it’s about matching the grinder to your brewing method.

I still remember my first grinder: whirring, clattering blade contraption that produced a mixture of powder and chunks. My coffee? Unreliable, stale, sometimes downright sour. Once I swapped that out for a burr grinder made especially for my pour-over gear, the results were immediate. Let’s make sure you skip that rough start.

  1. Blade vs. Burr Grinder: What’s the Difference?

Blade grinders cut beans irregularly. They’re inexpensive but generate uneven particle sizes, which can impair flavor negatively.

Burr grinders grind beans against two rough surfaces. This produces uniform grind size, which is important for even extraction.

Affiliate Tip: As a beginner, a budget burr grinder such as the Baratza Encore is a good option. It’s easy to use and well-suited to manual brewing techniques.

  1. Match Your Grinder to Your Brew Method

Different brewing methods need different grind sizes. Here’s a quick cheat sheet:

Brew MethodIdeal Grind TypeGrinder RecommendationFrench PressCoarseManual burr grinderPour-Over (V60)Medium-FineElectric burr grinder with settingsAeroPressMedium to FineAdjustable hand grinderEspressoFine and ConsistentEspresso-specific burr grinderCold BrewExtra CoarseBurr grinder with coarse range

Note: For espresso, avoid general-use grinders. You’ll need something with micro-adjustments like the Fellow Opus or Eureka Mignon.

  1. Manual vs. Electric: What Fits Your Routine?

Manual grinders are quiet, light, and great for travel or a single serving. But you’ll have to earn it—mini workout in the morning.

Electric grinders are the way to go if you desire speed and convenience. Higher end grinders enable grind size adjustment, timed dosing, and quieter operation.

Ask yourself: Do I make coffee for one person or a family? Do I want quiet or speed in the morning?

  1. Burr Material: Steel vs. Ceramic

Steel burrs are sharper, faster, and standard in premium grinders.

Ceramic burrs stay sharp for longer and generate less heat, aiding in flavor preservation.

For heavy day-to-day use, either will suffice but steel is more standard in modern, reliable models.

  1. Think About the Long Term: Maintenance and Durability

Low-end grinders burn out fast. Look for models with:

Replaceable burrs

Simple-to-clean components

Strong warranty and support

Affiliate Tip: Include a grinder cleaning brush in your kit cleaning your grinder extends its life and improves flavor.

Last Thoughts

A great coffee grinder is the backbone of every brewing setup. Think of it as a long-term investment not just in gear, but in flavor. Match it to your brew style, choose quality over convenience, and you’ll taste the difference in every cup.

read more: How an Espresso Shot Glass Can Improve Your Brewing Precision

Coffee Accessories on Amazon

Flat vs. Convex Espresso Tampers: Which One Should You Use?

Why Tamper Shape Matters More Than You Think

Once you’ve already determined the size of your tamper, there’s one other aspect that might trap you in: the shape of your tamper base. Is it flat or convex? It’s a small detail that will actually make a big impact to how your coffee extracts.

Let’s take a closer look so you don’t have to waste time second-guessing your gear.

Related article: Do You Really Need a Coffee Distributor Tool?

What’s the Difference?

FeatureFlat TamperConvex TamperShapeCompletely flat baseSlightly rounded, dome-shaped basePressure SpreadEven across the surfaceConcentrated in the centerChanneling RiskLow if distribution is perfect. Can reduce edge channeling in some casesSkill Required. Best for users with even distribution. More forgiving with puck prep

Flat Tampers: The Classic Standard

Most baristas especially in specialty cafes use flat tampers. With even distribution and tamp level, a flat base gives even resistance everywhere on the puck, which supports balanced extraction.

Flat tampers are ideal if:

You’re using a precision basket (like VST or IMS).

Your puck prep is clean and consistent.

You want full control over the tamping process.

Convex Tampers: A Forgiving Friend

Convex tampers have a slight dome that presses more toward the center of the puck. This can help minimize edge channeling, especially if your distribution isn’t perfect.

Convex tampers may work well for:

Beginners who are still refining their tamping technique.

Pressurized or non-standard baskets.

Equipment with non-uniform water dispersion.

Small Tip: Some budget espresso machines are assisted by convex tampers due to uneven shower screens.

So… Which One Do You Need?

Here’s a simple method for making up your mind:

✅ Go flat if you’re working with a standard or precision machine and want greater control.

✅ Go convex if you’re a newbie or with lower-end gear.

Technique is more crucial than tamper form in the end—but an accommodating tool will allow you to figure it out faster.

A Personal Aside on Shifting from Convex to Flat

I started off with a Breville Bambino and used a convex tamper to mask over my distribution deficit. And it was great. But when I switched to a Gaggia with a bottomless portafilter, I shifted to flat and could tell I was getting it wrong.

The upgrade wasn’t just about gear. It also instructed me to level up my prep, as well.

What’s best for your gear and technique skill set

There’s no such thing as the absolute perfect tamper shape only what’s best for your gear and technique skill set. If possible, try both. But don’t let this small detail hold you back from forging ahead on your espresso adventure.

Coffee Accessories on Amazon

What to Know About Coffee Freshness and Roast Dates

If you’ve ever brewed a cup that tasted flat or lifeless even from excellent beans–the problem might not be your grinder or technique. It could be freshness. Yes, coffee’s a food product, and as with all food products, it becomes stale after a certain period. Let’s break down what freshness is, why roast dates matter, and how you can keep your beans at their best for longer.

Why Coffee Freshness Matters

Freshly ground coffee is a rich, aromatic, and full-bodied drink. As coffee ages, it loses the volatile substances that give it coffee’s characteristic taste and smell. All that’s left is stale, sometimes even cardboard-flavored. Staleness can destroy even the best-brewed cup.

Freshness is not just about taste. Extraction is also impacted. Stale beans are brittle and dry, and it is harder to get balanced brew. You can have uneven bloom or poor crema when you pull espresso.

Understanding Roast Dates (Not Expiration Dates)

A common mistake people commit? Confusing roast dates as expiration dates.

Most supermarket coffee has only a “best by” date, typically 12 months forward. By the time you’re consuming those beans, however, they’re most likely lost their shine.

You’d rather have a roast date. Best, brew your beans:

3–5 days after roasting (to provide degassing time)

Within 3–4 weeks of the roast date (for ideal taste)

After that, flavor significantly declines.

Personal tip: I used to stock up on coffee when it was on sale. But even sealed packages got stale before I could finish them. Now I buy smaller quantities more often. My coffee’s never been better.

How to Store Coffee for Maximum Freshness

Air, light, heat, and moisture are coffee’s worst enemies. To keep beans fresh:
Store them in an airtight container (ideally opaque)
Store them in a cool, dry place (not the refrigerator or freezer)

Don’t buy in bulk unless you’ll consume them quickly

Some roasters package bags with one-way valves—these release CO₂ but don’t let oxygen in. If yours does, don’t dispose of it too soon; it’s doing useful work.

Should You Freeze Coffee Beans?

This is debated, but here’s a reasonable viewpoint: if you must store coffee over long periods, freezing will keep it but only if done properly.

Freeze beans in air-tight, portioned packets

Don’t repeatedly thaw and refreeze

Thaw to room temperature before opening (to avoid condensation)

Freezing is most effective as a backup solution, not the norm.

How to Know If Coffee Is Too Old

Curious about whether your beans have spoiled? Check for these things:

Flat or “woody” aroma

No bloom during brewing

Thin or empty flavor

No crema in espresso

If any of these sound familiar, perhaps it’s time to replace your bag with a newer model.

Check for roast dates

Improve your coffee experience, one of the easiest things you can do. Check for roast dates, buy in smaller sizes, and store beans in a secure environment. Once you’ve tasted how fresh coffee can impact your experience, you’ll never go back.

Coffee Accessories on Amazon

How to Store Coffee Beans to Keep Them Fresh

If you’ve ever brewed a cup of coffee that tasted flat or stale, the culprit might not be your brewing method it could be how you’re storing your beans. Coffee is incredibly sensitive to air, light, moisture, and heat, and poor storage can ruin even the best beans.

Here’s how to store your coffee like a true home barista to maintain flavor and freshness for longer.

  1. Understand What Affects Freshness

Coffee beans go stale shortly after roasting due to:

Oxygen exposure (oxidation)

Humidity

Sunlight and other light

Heat

All of these accelerate the process of staling, breaking down oils and aroma molecules which help give coffee its unique character.

  1. Ideal Storage Conditions

Cold dark place: Store beans in a cupboard or pantry, far from the cooker or windows.

Opaque, airtight container: Avoid clear jars or inadequately covered bags.

Avoid the fridge or freezer: Condensation due to moisture is your biggest drawback. Keep beans for only months if you keep them stored long-term. Otherwise, keep them out of the cold.

From experience: I used to keep my beans in a glass jar on the counter until I discovered my coffee started tasting flat within days. Switching to a vacuum-sealed canister totally made a difference.

  1. Choose the Right Container

Vacuum-sealed containers: Best for getting maximum freshness.

One-way valve bags: Generally used by roasters, they release CO₂ but do not let oxygen in.

Mason jars? As long as you store them in the dark and you drink them within a couple of days.

Tip extra: Label your vessel with the roast date so you’ll never know how fresh your beans are.

  1. Whole Beans vs. Ground Coffee

Always buy whole beans and grind them just before brewing. Ground coffee will lose flavor 4 times as quickly as whole beans due to the higher surface area.

If you absolutely must store pre-ground coffee:

Use a vacuum container

Purchase in small quantities

Store it tightly capped

  1. How Long Do Coffee Beans Remain Fresh?

Best freshness: Under 7–14 days since roasting

Good quality: Up to 4 weeks, if stored properly

Beyond 4–6 weeks: Flavor will noticeably degrade

If you’re paying good money

Treat your beans like fresh fruit. A little care about the way you store them can preserve their smell, sweetness, and complexity. If you’re paying good money for good beans, correct storage is the easiest way to ensure you’re getting your money’s worth and a better cup.

Quick Question: Have you been able to tell if there is a difference in the flavor once you’ve changed your coffee storagemethod?

read more: Best Coffee Storage Containers: Keeping Your Beans Fresh Longer

Coffee Accessories on Amazon

Classic Meals

- Advertisement -