Home Blog Page 29

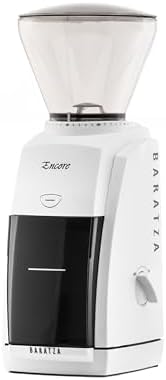
Is the Baratza Encore Still the King of Entry-Level Grinders?

For more than ten years, when you asked a barista what grinder to get for home, they’d always say the same thing, without even thinking: “Go for a Baratza Encore.”

  • Specialty Coffee Association Award Winning Grinders – Baratza grinders are preferred by coffee professionals and backed …
  • Go-To Entry Level Grinder – Baratza’s best-selling grinder, with its small footprint, is THE choice for brewing coffee a…
  • User Friendly – A convenient, front-mounted pulse button, plus a simple ON/OFF switch make it easy to grind fresh coffee…

It was just your average coffee, nothing too special. It wasn’t pretty, and it sure was noisy, but that thing was absolutely bulletproof.

Things have really changed in the market. Yep, new grinders such as the Fellow Opus and the Turin SD40 are on the scene, and with all their cool features, they make the mostly-plastic Encore seem really old-school.

We took another look at the original Encore and its new relative, the Encore ESP. We wanted to find out if the older model is still top-tier or if it’s been replaced by something fresh.

The “Tank” Reputation

“Tank” isn’t a bad name, you know. The Baratza Encore was king for so long because it’s so easy to repair. Most kitchen appliances aren’t really made to be fixed anymore; when they stop working, you’re usually expected to just toss them out.

Baratza simply operates in a different way. If your Encore breaks in five years, you won’t be buying a whole new one. You could just buy a plastic gear for, like, four bucks, or a motor for fifteen, right off their website, and then fix it yourself.

I’ve actually come across some Encores in businesses that have been going strong for more than ten years. “It’s really dependable and that’s just tough to beat.”

The Problem: The “Espresso” Gap

The old Encore always had one big problem. It just couldn’t grind for espresso. The steps we took to adjust things were just too big. Click #8 was too fine, which messed up your machine. Click #9 was too coarse, making for a really sour soup.

Baratza eventually said, “Yeah, this is an issue.”

Check out the Upgrade: The Encore ESP

Here’s the major update you need to know about. Baratza just put out the Encore ESP. It might look the same on the outside, but inside, it’s a completely different machine.

  • The Burrs: For the Burrs, people usually go with the standard M3. The ESP comes with the M2 cone burr, which grinds faster and sharper. It used to be something you had to pay extra for.
  • The Adjustment: The ESP has this dual-range adjustment system, which is a key part of “The Adjustment.” The first 20 clicks are micro-steps, just for espresso. The other clicks are just for drip coffee and French press.
  • Specialty Coffee Association Award Winning Grinders – Baratza grinders are preferred by coffee professionals and backed …
  • Go-To Entry Level Grinder – Baratza’s best-selling grinder, with its small footprint, is THE choice for brewing coffee a…
  • User Friendly – A convenient, front-mounted pulse button, plus a simple ON/OFF switch make it easy to grind fresh coffee…

The Grind Quality Test

We put both the classic and the ESP to the test.

For Drip/Pour-Over

This is for your drip or pour-over coffee. The old Encore is still great. You get a pretty consistent grind with this, and there’s a lot less of that annoying coffee dust compared to those cheaper blade or ceramic burr grinders. It makes a nice, clean, sweet cup of V60.

Espresso time!

The old Encore doesn’t quite cut it in this situation. It’s just not precise enough.

The Encore ESP is really something else. “We were able to really dial in a shot of light-roast Ethiopia and it came out surprisingly accurate.” It goes head-to-head with grinders that are double the price, and it certainly holds its own.

The Noise Factor

We need to keep it real. That Encore really cranks. It just uses a really strong DC motor that’s hooked up to a gearbox to slow things down. It’s like a blender, but all muffled up.

Newer competitors like the Fellow Opus are quieter, but they often lack the raw torque to chew through dense, light-roast beans without stalling. The Encore just keeps going, no matter what.

So, what’s the verdict? Which should you actually get?

It all comes down to your espresso machine.

Go with the Classic Encore if: All you’re into is drip, French press, or AeroPress coffee. It’s still my go-to for filter coffee, always dependable. It’s straightforward, the parts aren’t expensive, and it should hold up for ten years.

Go for the Encore ESP if: You already own an espresso machine, or if you’re thinking of getting one. You pay a little more and get metal parts inside where it counts, the quicker M2 burr, and it can actually make real espresso. This is currently the best all-around grinder you can get for your money.

The Verdict So, here’s the deal: The old favorite, the Encore, isn’t totally dominating the market like it used to. But the Encore ESP really did a great job holding onto its top spot, even with all those new competitors popping up.

The Amazon King: Is the Veken Coffee Canister Actually Good? (Review)

When you search for “coffee storage” on Amazon, the very first result that pops up is the Veken Canister. Loads of people give this five-star ratings, and it’s way cheaper than fancy brands like Fellow or Airscape.

  • Gifts for Coffee Lovers This Christmas: This elegantly designed jar is a stylish and functional gift for coffee lovers, …
  • Date Tracker, Window, & Free Scoop:Keep your coffee fresh by setting storage or expiry dates with our date tracker on th…
  • Premium Quality Assurance:We understand the importance of quality when it comes to your coffee experience; That’s why ou…

When it comes to coffee, going cheap usually ends up costing you more in the long run because it messes up your beans.

We really looked into how well it’s built, checking out the valve parts and that “viewing window” everyone talks about. We wanted to see if this budget option is truly top-notch or just another cheap stainless steel marketing trick.

Engineering isn’t like a sealed-off vacuum; it’s more like taking a much-needed breather.

Let’s get one thing straight from the start. The Veken really isn’t a vacuum canister. It doesn’t suck air out. It’s an airtight container that has a one-way CO2 valve.

When coffee is freshly roasted, it lets out carbon dioxide. When you put coffee in a glass jar, the gas gets stuck inside, and that can make your coffee go stale. That tiny plastic valve right in the middle of the Veken lid? It’s pretty smart it lets the CO2 out, but totally stops any oxygen from sneaking back inside.

Yeah, it totally works! Yeah. Considering what it costs, the valve works as it should. It does a good job of keeping things steady inside, which is perfect for your everyday grocery store coffee or beans from a local roaster. But it leaves the same air in the jar with the beans, unlike those vacuum sealed containers.

The “Window” Controversy

This canister has a clear strip going up the side, which lets you actually see how much coffee is left inside. I find it super handy. You’ll never run out of coffee by surprise.

The coffee expert explained that light really messes with coffee. UV rays really mess with the flavor, making it go bad fast. Veken really messed up by putting in that window; it created a weakness.

Don’t leave this canister out in the sun on your counter if you buy it, it’s really not good for it. They call it a “pantry canister” because of the window. If you put it in a dark cupboard, the window won’t be a problem at all.

The Daily Workflow (The “Fidget” Factor)

The lid works just like an old mason jar with that familiar wire-clasp, and it has a silicone seal that’s BPA-free. The seal closes with a nice, solid “thunk.” This seal is so good you could technically grab the whole thing by the lid, but seriously, please don’t do that.

The Date Tracker The lid has a dial that lets you keep tabs on freshness. Honestly? That’s just a gimmick. Most people just set it, find those plastic wheels a bit tough to budge, and then leave it alone.

Build Quality We made sure this is built to last. It’s made from 304-grade stainless steel. This thing feels pretty light, but it seems like it can really take a beating. If this slips from your hand and hits the kitchen floor, you might get a dent, but at least it won’t break into a million pieces like a glass jar would.

Filter Maintenance One hidden annoyance that often goes unnoticed is the valve filter; it really needs good filter maintenance. Sure, it does the trick, but give it enough time, and all sorts of gunk like oil and dust will start to build up, plugging it right up. You actually have to change those tiny valves now and then (Veken typically gives you extra ones), and that’s something most folks just don’t remember to do.

So, who’s this really for, then?

Buy it if: If you’re looking to step up your coffee storage game from that flimsy paper bag, but you’re not into spending a fortune on a jar, then the Veken is definitely for you. It’s a really good starting point for your storage needs. It’s good for keeping ants away, lets CO2 escape, and honestly, it looks pretty okay on your shelf.

Skip it if: Don’t bother with the Veken if you’re buying really pricey, light-roast coffee beans you know, the kind that cost over $25 a bag. Your Geisha coffee could really use better protection, since it doesn’t have active oxygen removal and that window is letting in all the light.

The Bottom Line

Okay, so imagine you’re looking for a coffee canister that just… works. You know, like a Toyota Camry. It’s reliable, gets the job done, and you don’t have to think too hard about it. That’s kinda what we’re talking about with this canister.

It’s nothing fancy, and it won’t blow you away, but it gets the job done for what you pay. Just make sure it’s not in the sun.

Is the Fellow Atmos Vacuum Canister Worth the Hype? (Real World Review)

If you’re just buying regular coffee from the grocery store, then you really don’t need this canister. If you are forking over $25 for a bag of those fancy single-origin Ethiopian beans, keeping them in their original bag is just wrong for the taste.

  • GUARD THE GOODS: Keep your coffee beans fresher longer by storing them in Atmos, a vacuum-sealed storage canister. Simpl…
  • MUCH MORE THAN COFFEE: Stash peppercorns, loose-leaf tea, peanuts, spices, and anything you want to keep fresh in this f…
  • AIRTIGHT SEAL: A beautifully functional and fully sealable jar, Atmos has a powerful silicone ring that stops air, moist…

It’s like, oxygen is bad news. It makes the good stuff in coffee go bad real fast, like in a few days.

There are so many ways to store stuff these days, but the Fellow Atmos says it’s doing something different. It’s not just about sealing air out; it really sucks the air that’s already in there, right out. We really dug into whether the seal held up, how long the vacuum lasted, and that “fidget factor” to figure out if it was worth the higher cost.

So, here’s the deal with how it all works out

Most containers, like the Airscape, operate by moving air out of the way. You press a plunger to get the air out. The Atmos uses a vacuum to do its thing.

The lid has a secret pump inside. Just twist the outer ring, you know, back and forth. This move just really takes all the good air out of the room.

The coolest part of the engineering? It’s that tiny vacuum lock indicator. Once there’s a good pressure drop, you’ll see a green ring pop up on the lid. You’ll see right away that your beans are okay.

  • GUARD THE GOODS: Keep your coffee beans fresher longer by storing them in Atmos, a vacuum-sealed storage canister. Simpl…
  • MUCH MORE THAN COFFEE: Stash peppercorns, loose-leaf tea, peanuts, spices, and anything you want to keep fresh in this f…
  • AIRTIGHT SEAL: A beautifully functional and fully sealable jar, Atmos has a powerful silicone ring that stops air, moist…

The Real-World Test

We spent a month living with the Atmos. Here’s what it’s really like to use it every single day.

1. The Freshness Factor

It just works. We kept the beans for three weeks, and they still ended up blooming once we poured hot water on them. This vacuum seal actually keeps things fresher way longer than just a normal sealed jar. For keeping things fresh over a longer stretch, like two to four weeks, this works better than those displacement canisters.

2. The “Fines” Problem

Most reviews out there? They don’t mention the real issue: “Fines.” That’s the part where things usually go wrong. A gasket is what makes the vacuum seal work.

You know, if you store coffee that’s too finely ground, or if some of that papery bean skin gets on the rim, it just won’t seal right. The Atmos is quite sensitive. You need to keep the rim clean. If there’s even one tiny speck of coffee dust on the gasket, air can sneak back in while you’re sleeping, and then that green dot will be gone by morning.

3. The Workflow

So, twisting the lid usually takes around 10 seconds. It makes you feel good, kind of like winding up a watch. But you have to press a button to let the pressure out before you can open it. It’s making a hissing sound. It’s like opening an airlock.

Glass versus Steel: What’s the best option?

You can buy this from Fellow in either clear glass or a sleek, matte black stainless steel. You know, UV light can mess with your coffee’s taste as quickly as air does. If you’re not keeping your canister in a dark cupboard, then getting the glass one just doesn’t make sense. That steel one is really tough.

Should you buy it?

The Atmos costs a lot. You’re paying for how it works and how it looks.

Buy the Atmos if: You’re someone who sips your coffee over time. If your bag of beans usually sticks around for three weeks or longer, you’ll really need that vacuum feature. It’s the key to making sure your coffee tastes fresh from the first cup down to that very last one. It’s also great for keeping nice tea safe.

Don’t bother with the Atmos if: You go through a bag of coffee in five days. For a little while, there’s hardly any change in how fresh it is.

If you want something with pretty much no upkeep, grab an Airscape. You’ll need to make sure the Atmos rim stays clean so it can keep its vacuum seal.

The Verdict: It really is over-engineered, but in the best possible way. You do need to take a little care with it, but if you’re looking to keep those really nice beans fresh right there on your counter without plugging anything in, this is your best bet.

5 Meal Prep Recipes You Can Make in 10 Minutes with a Chopper

A lot of people just stop meal prepping because of all the chopping. Nobody wants to spend their Sunday afternoon, you know, their relaxing weekend time, dicing onions and peppers for two hours.

It’s not the cooking that takes forever; it’s all the chopping and dicing beforehand.

If that vegetable chopper is just sitting in your cabinet somewhere, you’ve got yourself a real time machine. I mean, I use mine to take what would be an hour of chopping and knock it down to around eight minutes.

That’s not the real secret, it’s not just about how fast you go either. It’s all the same, that’s what it is. When you cut all your peppers and onions to be roughly the same size, your salads just taste better, and your frittatas will cook more evenly.

“You can get these five meal prep basics ready in less than ten minutes with a chopper.” Okay.

The “1-Minute” Pico de Gallo

Store-bought salsa tastes like cooked tomatoes, it’s just got that unmistakable flavor. Fresh pico de gallo really makes a difference, but trying to dice all those tomatoes by hand is just awful.

Get ready: Grab the little dicing blade.

Okay, so for this, you’ll want to cut your onions into quarters. Do the same with your tomatoes, but make sure you scoop out those watery seeds beforehand. And don’t forget to quarter your jalapeños too. Just push them through the grid.

Just mix it with some lime juice, salt, and cilantro. It makes these neat, small squares that are great for scooping up with chips or putting on a chicken bowl. They just stay put, which is nice.

The Confetti Quinoa Salad

There are two of them. This is the best office lunch. It’ll be good in the fridge for four days before it gets all soggy.

Okay, to get started, just put in that tiny dicing blade.

First, chop up the cucumbers, then the red bell peppers, the red onions, and finally, the carrots. Since the pieces are so tiny, like confetti, they blend right into the quinoa really well.

Why this works: When you cut veggies yourself, you usually end up with bigger pieces. The chopper cuts them to about the same size as quinoa, which means you get that perfect grain-to-crunch mix with each bite.

Here’s the thing, it’s not really about the tools themselves; it’s about how we use them and the way they shape what we do.

Freezer-Ready Omelet Bags

If you’re craving a warm breakfast before work, just prep all the omelet fillings in bulk ahead of time.

Okay, to get started, make sure you’re using the big dicing blade.

First, you’ll want to take care of the mushrooms, bell peppers, onions, and ham. Scoop out about half a cup of this mix, put it in Ziploc bags, and then pop those in the freezer.

So, why does this method work so well? Simple. In the morning, all you do is empty a bag into the pan. The chopper made them all the same size so they cook up in just two minutes.

The Chunky Greek Village Salad (Horiatiki)

A real Greek salad doesn’t have lettuce in it at all. It uses pieces of sturdy vegetables.

Okay, for this, you’ll want to grab the big dicing blade.

Okay, so here’s how you do it: just take those cucumbers (leave the skin on!), green peppers, and those firm roma tomatoes, and run them through the big grater. Just mix it with some feta cubes, olives, oregano, and olive oil.

It really works because this salad is all about that satisfying crunch. The big blade helps the veggies stay crisp in the fridge for three days.

Classic Chicken Salad Base

Five. A good chicken salad really comes down to the texture, and what makes it special is that crisp bite from the celery and onions, not some mushy mess.

To start, just use the little dicing blade.

Here’s the trick: grab your celery, sweet onions, and hey, even some pickles. Just chop them all up. Just toss the crunchy stuff with your shredded rotisserie chicken and mayo.

Here’s a good reason this works: you get that deli-style crunch that’s spread out nicely. It’s not like you bite into a huge piece of onion in one spot and then nothing in another.

Just one rule for storage

The chopper really gets through those cell walls quicker than if you used a knife. This makes more liquid come out.

If you’re going to use these later in the week, just pop a folded paper towel into the bottom of your glass container. It soaks up the extra wetness and will keep your Confetti Salad nice and crisp until Friday.

How to Clean Those Tiny Blades: Maintenance Guide for Choppers

In my last article, I talked about if you should go with a manual or an electric vegetable chopper. This article is going to talk about a really important topic: staying clean. Feel free to drop your thoughts on the article down there.

The thing about having a vegetable chopper that really gets you is not the chopping itself. It’s what’s left after everything’s happened. You ever look at one of those sharp steel graters, and just know there are tiny bits of onion or pepper caught in spots you can’t possibly clean?

Most folks mess up in one of two ways right here. They’ll either leave it soaking in the sink, which is super gross, or they’ll try to scrub it down with a sponge. That’s a surefire way to ruin a sponge and risk hurting your fingers.

Keeping things clean is simply about regular upkeep. Look, even something tough like stainless steel will get messed up if you leave acidic stuff like tomato juice or onion sulfur on the blades too long. It’ll just corrode or lose its sharp edge eventually.

The best way to keep your cooking knife super sharp, without getting hurt, is to use this method.

That First Minute Counts

That first minute after you’re done getting ready? That’s when everything counts. It’s really where you win or lose the whole thing.

Vegetable starch is like a glue. When onion juice or potato starch dries on a plastic frame, it becomes a really tough cement that’s super hard to get off.

Okay, so the routine is: once you’ve dumped out the catch bin, grab that blade insert and head straight to the sink with it. Just spray it with hot water right away. Don’t scrub it right now; just get the loose stuff out before it dries. Just doing this one little thing will save you a good ten minutes of scrubbing down the road.

The Essential Toolkit

You really need the right stuff, and that means staying away from your regular kitchen sponge. It’s too squishy, and the blades would just turn it into tiny plastic bits that would clog up the grates. You gotta be firm with this.

  • The “Claw”: Most choppers usually include a little plastic cleaning tool, often called a “claw” or “comb.” Don’t lose this. It is the only material slender enough to slide between the teeth of the push-block.
  • Long-Handled Brush: You absolutely need a long-handled brush, like one for bottles or dishes. It puts your hand a safe three inches from where the action is.
  • Toothpick: A toothpick is great for those tight spots where the metal and plastic meet.

Step-by-Step Deep Clean

Just follow these simple steps for a really deep clean.

1. Get the food out

If there’s stuff stuck in those plastic teeth on the pusher lid, just grab the “Claw” tool and scrape it clean. Do this dry or under running water. If you try this with a rag, all you’ll achieve is pushing the food in even more.

2. The Directional Scrub

So, just put some dish soap right on your brush. Rub the blades in the same direction as the steel’s natural lines. Rubbing the brush against a sharp edge will dull it and mess up the bristles. Start in the middle and work your way out.

3. The “Bear Trap”

Don’t ever, ever drop a blade grid into a sink filled with soapy water. It’s an “invisible” danger. We call this the Bear Trap. You’ll totally forget about it, then reach for a spoon and just cut your hand open.

If you have to soak it, put it in a clear bowl right on the counter, not in the sink.

Is this okay to put in the dishwasher?

I’m not so sure about that. Manufacturers often say something is “top rack dishwasher safe.” As someone who’s spent a lot of time with kitchen stuff, I really wouldn’t recommend it for those blade inserts.

Dishwashers, with their high heat and strong soaps, can really mess up a knife’s super sharp edge over time. Big deal, the constant heating and cooling can make the plastic housing bend out of shape. If that plastic part warps just a millimeter, those pusher teeth won’t line up right with the blade grid, and everything will just jam up.

Okay, my tip: just put that catch bin right into the dishwasher. Wash the blade assembly by hand.

Drying and Rust Prevention

Stainless steel isn’t actually “stain-proof”; it just stains less readily than other metals. If you put a wet chopper back into a dark drawer, rust spots can form.

Give it a good shake to get rid of the extra water, then just let it air dry completely on a rack. Don’t put the unit back together until it’s really dry. If there’s moisture stuck in the container, that’s just asking for mold to grow.

Manual vs. Electric Choppers: Do You Really Need to Plug It In?

In our previous article, we examined Fullstar vs Mueller vegetable choppers to determine which one lasts longer. Both products are used to cut hard vegetables and fruits, and the durability of each is tested. In the next article, we’ll examine what to consider when using vegetable slicers. In this article, we’ve written about the difference between manual and electric slicers.

Cooking should not require a power strip for a single garlic clove. Yet, the kitchen gadget industry keeps pushing motors on us for tasks that often take ten seconds by hand.

We see this question constantly: “Should I buy a cheap pull-cord chopper or invest in a mini electric processor?”

The answer comes down to one specific variable: Texture Control.

If you buy the wrong one, you will either end up with a chunky, uneven mess or accidental baby food. We broke down the mechanics, the cleanup time, and the actual workflow to help you decide which one earns a spot on your counter.

The Case for the Manual Chopper

When we talk about manual choppers, we usually mean the “pull-cord” style (like the Kuhn Rikon) or the “push-down” grid style (like the Fullstar).

The Texture Advantage This is the biggest selling point. With a manual pull-cord chopper, you have total control. One pull is a rough chop. Three pulls is a dice. Five pulls is a mince. You can stop exactly when the onion is the size you want. You rarely get that “onion soup” liquid at the bottom of the bowl because the blades spin slower.

The Workflow It is grab-and-go. You do not need to unwind a cord, find an outlet, or assemble a heavy motor base. For a quick pico de gallo or chopping nuts for a brownie topping, it is significantly faster than setting up an electric machine.

The Downside It requires physical effort. If you are prepping five pounds of onions for a soup kitchen, your arm will get tired. Also, the capacity is usually smaller.

The Case for the Electric Chopper

Mini food processors (like the Cuisinart Mini-Prep) are powerful beasts. They rely on speed and torque.

The Consistency Advantage If you need to make a paste, a dressing, or a smooth hummus, the electric chopper wins every time. A manual chopper simply cannot generate the RPMs needed to emulsify oil and vinegar or break down chickpeas into a smooth cream.

The “Mush” Risk This is the main problem with electrics. They are aggressive. If you look away for two seconds while chopping an onion, the motor will obliterate the cell walls. You end up with a watery mush instead of crisp pieces. It requires pulsing carefully, which takes focus.

The Accessibility Factor For cooks with arthritis or limited grip strength, an electric chopper is non-negotiable. It does the heavy lifting for you.

The “Salsa Test”

We always use salsa to settle this debate because it requires chopping tomatoes without turning them into juice.

  • Manual Chopper: Wins easily. You get distinct, chunky pieces of tomato, onion, and cilantro. It looks like restaurant-style salsa.
  • Electric Chopper: Often fails. Unless you are extremely careful with the pulse button, the tomatoes turn pink and frothy. It tastes fine, but the texture is like gazpacho.

So, Which One Should You Buy?

This decision is not about price; it is about what you cook.

Buy the Manual Chopper If: You mostly chop onions, garlic, herbs, and nuts for dinner prep. You value counter space and hate dealing with power cords. You want crisp veggies, not mush. It is the best tool for daily “mis en place.”

Buy the Electric Chopper If: You make a lot of sauces, dressings, dips (like hummus or pesto), or baby food. It is also the correct choice if you need to process hard ingredients like stale bread for breadcrumbs or blocks of parmesan cheese.

Our Honest Recommendation For 90% of home cooks, a high-quality manual pull-chopper is actually more useful. It is faster to clean, easier to store, and gives you better results for basic vegetables. Save the electric motor for the big food processor.

Classic Meals

- Advertisement -