Home Blog Page 23

ProKeeper vs. OXO POP: Which Brown Sugar Container Seals Better?

You’ve got the butter softened, the chocolate chips ready, and the oven heating up. You open the pantry, reach for the bag of brown sugar, and see it’s all packed into a hard block. It’s so annoying.

Before you start poking at it with a butter knife or grabbing a slice of bread to fix things, take a moment to check what’s really going on with your storage container. If you find yourself staring at a solid lump of brown sugar and want to make sure it never gets like that again, you’ll want a container that seals completely tight.

Let’s check out the two most popular pantry staples, the oxo brown sugar keeper and the progressive brown sugar keeper, to see which one actually keeps your baking ingredients fresh.

Why Does This Keep Happening?

It’s a question we all ask when things don’t go the way we expect. Sometimes it feels like the same mistakes or problems just repeat themselves over and over, no matter what we do. Maybe it’s a pattern we haven’t spotted yet, or maybe there’s something deeper we need to understand. Either way, it’s frustrating to feel stuck in the same spot without a clear reason why.

To fix the problem, it helps to understand why your sugar isn’t behaving. Brown sugar is just white sugar mixed with molasses, and molasses has quite a bit of water in it. If you leave a bag open or put it in a container that isn’t fully airtight, the water inside will just evaporate. As the moisture goes away, the sugar crystals begin to stick together.

When your brown sugar hardens, it’s simply because air got inside. You need a container that completely stops evaporation in its tracks.

Contender 1: The OXO Good Grips POP Container

This is the kind of container that shows up in nearly every neat and tidy pantry you come across on social media. It works by simply pressing a button that opens the lid. You press the button to stretch the silicone ring, forming a tight seal, and that same button works as a handle.

  • The Specs: It’s really popular. It has a 4.5-star rating from more than 29,200 reviews, and over 5,000 units were sold just last month.
  • The Catch: According to real user reviews, like the one from Amazon user V. DeLeo, the push-button mechanism can start to feel a bit off or not work as smoothly after a while, sometimes allowing tiny bits of air to sneak in. Also, the terra cotta disk that keeps the sugar moist isn’t included—you have to buy it on its own.

Contender 2: The ProKeeper+ Airtight Container

If pretty containers in your pantry don’t keep your sugar soft, the ProKeeper is a tough option made just for that.

  • How It Works: Rather than using a vacuum button, the progressive brown sugar keeper uses a thick silicone seal that’s held shut with a stainless-steel latch that hinges to keep it locked. When you close it with a snap, it just stays closed.
  • The Specs: It has fewer reviews than OXO, but it still scores higher in overall satisfaction with almost a perfect 4.8-star rating based on more than 2,900 reviews, and over 4,000 units were sold just last month.
  • The Catch: You usually need two hands to open the sturdy metal latch. It looks tougher and more practical, quite different from the clean, simple style of the OXO POP.

The “I Need It All” Factor: Accessories

One big thing that sets them apart is what comes in the box. If you want to keep brown sugar soft for a long time, using a terra cotta disk helps since it releases moisture slowly.

The ProKeeper includes this disk and even has a special snap-in spot under the lid to keep it from getting lost in your sugar. With the OXO, you’re really just getting the plastic box itself; if you want any moisture-saving accessories, you’ll have to buy those separately.

A Quick Look at Your Options

Here’s a quick rundown of your options.

FeatureOXO Good Grips POPProKeeper+ Airtight
Seal TypePush-button vacuumStainless-steel latch with silicone
Amazon Rating4.5 Stars4.8 Stars
Monthly SalesOver 5,000 unitsOver 4,000 units
Terra Cotta DiskSold separatelyIncluded in the box
Best ForA neat, attractive pantryKeeping food fresh for a long time

Choosing the Right Container

Picking the right container depends on what you want for your pantry and how much patience you have.

If your pantry is already filled with OXO containers and you want everything to look consistent, the oxo brown sugar keeper is a good option. Just make sure to get the extra terra cotta saver and watch out for how the push-button seal works.

If you want something you can lock up and not worry about dried-out sugar for months, the progressive brown sugar keeper is a safer and more reliable option. The mechanical latch hardly ever lets you down, comes with the accessories you need, and the higher customer rating shows it really works as it should.

ENOLVO Terracotta Brown Sugar Saver Review: The $7 Fix for Hard Sugar

If you bake even once in a while, you’re probably familiar with the frustration of opening your pantry only to find your brown sugar has hardened into a solid, rock-like brick.

  • Keep Brown Sugar Soft: Tired of rock-hard brown sugar? Our Terra Cotta Brown Sugar Saver Disk keeps sugar moisture and i…
  • Food-Safe Natural Moisture Control: Our Brown Sugar Saver is made of natural food-grade terra cotta. Clay stones release…
  • Multiple Uses: Not only brown sugar, but terracotta brown sugar saver can also maintain softness when storing cookies, b…

Instead of tossing it or scraping it off with a butter knife, many home bakers are going back to an old-school fix: the clay moisture disc.

The ENOLVO Terracotta Brown Sugar Saver has gotten really popular lately, with more than 5,000 units sold just last month. But does a plain piece of unglazed clay really do the trick, or is it just another kitchen gadget that doesn’t live up to the hype?

We carefully checked out the science, the design, and what actual users had to say to find out if this $7 disc can really bring your ruined baking supplies back to life.

How a Small Piece of Clay Fixes Your Sugar

Brown sugar gets hard because it dries out and loses its moisture. The molasses that gives it its rich flavor tends to dry out, making the sugar crystals stick together. A small piece of clay can help fix this by adding moisture back to the sugar, softening it again.

The ENOLVO disc operates using simple hydrodynamics. It’s made from natural terracotta clay that’s food-grade and pretty porous.

  • The Process: It is simple: just soak the disc in water for about 15 to 20 minutes. The clay soaks up the liquid. You dry the outside so it won’t drip, then stick it right into your sugar container.
  • The Result: Over the next few weeks, the clay gently lets the trapped moisture go, releasing it back into the container and keeping the humidity just right.

Does It Really Work on a “Brick”?

It’s simple enough to keep soft sugar soft, but what do you do when your sugar has already gone hard as a rock?

Users say the “resurrection” power of this small disc really works well. User Allie Julius shared what happened when she tried to rescue a fully hardened batch:

“I had a container with a solid brick of hard brown sugar. I followed the instructions, and by the next morning, the sugar was soft again.”

Another user, undrell, mentioned that if you keep the disc in a container with a tight lid, it keeps the sugar soft enough that you can just shake it out instead of digging around for it.

Usually, if you bury the soaked disc in hard sugar and close the lid tightly, it will take anywhere from 12 to 48 hours to soften all the way, depending on the size of the brick.

Versatility: More Than Just Sugar

Even though it’s called the Brown Sugar Saver, the ENOLVO disc actually works as a moisture controller for more than just sugar.

Since it’s made from pure, natural clay with no chemicals or glazes, you can put it in any airtight container to stop food from drying out. It works great for:

  • Baked Goods: Keeping cookies soft right in the cookie jar.
  • Snacks: Keeping marshmallows from turning rubbery. The key is to store them in an airtight container and avoid exposing them to too much air or moisture. That way, they stay soft and fluffy instead of getting chewy and hard.
  • Dried Fruits: Keeping raisins and coconut flakes nice and plump.

Handy Tip: If you bake the disc in the oven at 200°C (about 400°F) for 15 minutes to dry it out completely, it can work like a moisture absorber. You can mix it with salt or spices to stop it from clumping when it’s humid.

The One Rule: Never Use Soap

If there’s a downside, it’s that it takes some upkeep. The one rule with this product is to never use soap.

You can’t put this in the dishwasher, and you should never clean it with dish soap. Since clay acts like a tough sponge, it soaks up the soap. If you accidentally drop a soap-soaked disc into your brown sugar, your next batch of cookies will end up tasting like Dawn dish detergent.

When it needs cleaning, just rinse it off with warm water and let it air dry.

Pros and Cons

ProsCons
Price: Under $7 means you won’t have to waste spoiled ingredients.Maintenance: Hand wash it and don’t use any soap.
Effective: Works by softening hardened sugar in just 24 hours.Prep Time: You need to soak it for 15 minutes before using it each time.
Reusable: Can last for many years. Just soak it again every 2 to 3 months.Container Dependent: This only works if your jar has a tight seal.
Natural: Made from 100% food-grade clay with no chemicals at all.

The Bottom Line

If you’re fed up with your baking ingredients hardening but don’t want to drop $20 on a fancy new storage container, the ENOLVO Terracotta Brown Sugar Saver is the best buy you can make.

It’s tiny—just 2×2 inches—doesn’t take up any space, costs next to nothing, and fixes one of those annoying kitchen problems almost instantly. Just make sure to keep it in a container with a good airtight lid, and your brown sugar will stay soft and easy to scoop anytime you need it.

Ninja Express Chop Review: Is It Overkill for Just Onions?

Crying over chopped onions is a rite of passage for home cooks, but it doesn’t have to be. Usually, you have two choices to solve this: drag out a massive, heavy food processor that takes 10 minutes to clean, or buy a cheap manual pull-chopper that requires an arm workout.

The Ninja Food Chopper Express Chop (NJ110GR) sits comfortably in the middle.

  • 200 watt power pod.
  • Effortlessly mince, chop, grind and blend a variety of ingredients for easy meal preparation or final touches
  • Perfect for garlic, onion, zest, spices, herbs, cheese, bacon crumbles, nut chopping, chocolate, dressings, sauces and s…

It’s an electric “power pod” that claims to mince, chop, and blend in seconds. With over 15,000 positive ratings and 1,000+ sold last month, people clearly love this gray little gadget. But at around $50, is it worth the investment if you just want a glorified ninja onion cutter?

We analyzed the specs and real user experiences to see if this 200-watt machine is a kitchen essential or just an expensive luxury.

Design: The “Power Pod” Difference

Most food processors have the motor at the bottom, making them heavy and bulky. The Ninja flips the script.

  • Top-Mounted Motor: The 200-watt engine sits on top of the bowl like a lid. This is brilliant for two reasons: it keeps the footprint tiny (perfect for small counters), and you can remove the motor to wash the bowl without worrying about getting electrical parts wet.
  • Capacity: It holds 16 ounces (about 2 cups). This is the “Goldilocks” size big enough for a whole onion or a batch of salsa, but small enough to rinse in the sink in 30 seconds.
  • Manual Control: There are no complex buttons. You press the large gray button on top to pulse. As the ninja food processor manual suggests, short pulses give you chunky salsa; holding it down gives you a smooth puree.

Performance: More Than Just Veggies

We asked the big question: Is it overkill for onions?

If you only chop one onion a month, yes. Use a knife.

But user feedback shows this tool does significantly more than just basic chopping.

1. The Onion & Garlic Test

User Orlayda praises it for daily cooking, specifically for chopping onions and garlic quickly. The stacked blade design prevents that annoying issue where the bottom turns to mush while the top chunks stay whole.

2. The “Oat Flour” Surprise

This is where the 200 watts matter. A manual pull-chopper can’t grind grains. However, user Micaela Coco De Marco bought this specifically to “refine oats to make oat flour for cookies.”

  • Analyst Note: The ability to grind dry ingredients puts this in a league above standard mini-choppers.

3. Small Batch Salsa

User Coop noted it’s perfect for making a “small amount of salsa.” If you use a giant blender for salsa, you often end up with a pink soup. The Ninja’s pulse control lets you keep the texture chunky.

Is It Better Than a Manual Chopper?

We often review manual pull-choppers (like Zyliss). Here is how the electric Ninja compares:

  • Speed: The Ninja is faster. 3 pulses vs 10 pulls.
  • Consistency: The electric motor provides constant torque, meaning hard carrots don’t get stuck.
  • Effort: This is key for anyone with arthritis or tired hands. You just press a button.
  • The Downside: It has a cord. You need an outlet.

Pros and Cons

ProsCons
Power: 200 Watts handles nuts, oats, and ice.Corded: Tethered to an outlet (unlike manual ones).
Hygiene: Motor pod never touches the food.Capacity: 16oz is too small for big meal prep.
Versatility: Chops, minces, grinds, and blends.Price: More expensive than manual alternatives.
Easy Clean: Bowl and blades are dishwasher safe.

The Bottom Line

So, is the Ninja Express Chop overkill?

  • YES, if you literally only slice one onion a week. Save your money and buy a manual pull-chopper or a nice knife.
  • NO, if you cook daily and want a “sous chef” that can handle garlic, nuts, oat flour, and dressings without taking up space.

It bridges the gap perfectly. It has the power of a big blender but the convenience of a mini chopper. For small households or quick “daily” tasks (as Orlayda mentioned), it is indispensable.

Press vs. Chopper: The Best Way to Mince Garlic Without Sticky Hands

Everyone’s a fan of garlic, right? But really, we all know how much of a drag the prep can be.

The skin comes right off, and yeah, it gets all over your fingers. When you chop it, the juices stick to your fingers. You can scrub your hands all you want with lemon, stainless steel soap, and even prayer, but that smell just sticks around for a couple of days.

For years, if you didn’t want to use a knife, your only option for garlic was a metal press. But lately, everyone seems to want a manual garlic chopper.

These little gadgets promise to chop whole bulbs in seconds without you messing with the cloves at all. So, are you thinking of retiring your heavy metal press? We looked at both ways to find out which one would keep your hands cleaner and make your dinner taste better.

  • Maximal Amount & Minimal Pressure – The garlic press has 37 small spikes that match up with the holes in the chamber ide…
  • Ease of Use – Avoid the stress by selecting a garlic mincer with an ergonomic, streamlined design that’s easy to clamp a…
  • Built to Last – Zinc is an ideal material for garlic presses, it is strong enough to easily press through garlic, withst…

The Old School: The Garlic Press

This is the tool your grandmother used. It’s like a simple lever. Just pop in a clove, really squeeze it, and crushed garlic just comes right out.

The Good:

  • Flavor: The best part? You get so much flavor. When you press garlic, it really breaks down those cell walls, letting out all the oils and giving you that strong, awesome taste.
  • Speed: For just one clove, you can’t get any quicker. Just squeeze and that’s it.

The “Sticky” Reality: Here’s the problem. After you squeeze it, you’re left with this odd film of garlic skin hanging out in the chamber. Yeah, you really gotta just scratch it out with your nail. Afterward, you’ll need to spoon the mashed garlic from the press.

You still touch the garlic. Your hands still have that smell.

  • Chops veggies, herbs, nuts and more into uniform pieces
  • Sharp, stainless steel blade rotates as you pump the handle
  • Comfortable knob designed for minimal effort on your part

The New School: The Manual Garlic Chopper

For folks who use a ton of garlic in their cooking (like, at least 4-5 cloves every time), the usual press just doesn’t cut it.

Just pop in the manual garlic chopper. Yeah, these are typically little containers that have blades inside that spin around. You either pull a cord, kinda like a Zyliss, or push down on a pump, like the OXO ones, to get them going.

The Good:

  • Volume: You can throw in 5, 8, or even 10 cloves all at the same time.
  • Consistency: You get to decide how smooth or chunky you want it. For chunks, give it two pulls. If you want a really fine mince, pull it about ten times.

The “Clean Hands” Victory? That right there is what changes everything. You just peel the garlic, or get the kind that’s already peeled, toss the cloves in the cup, pop the lid on, and give it a whirl. Once you’re finished, just pop out the blade and tip the garlic right into your pan.

The Reality Check: We have more to clean up. A press is a single thing, but a chopper has three parts: a bowl, a blade, and a lid. Most of them are safe to put in the dishwasher, though, so if you’ve got one, that’s not really a problem.

Which One Should You Choose?

So, you’re trying to figure out which garlic tool is right for you, huh? Let’s break it down.

Stick with the Press If:

  • You just want to use a little bit of garlic. If a recipe only asks for one clove, it just isn’t worth making a mess with the whole chopper.
  • You want immediate satisfaction. It gives you a nice paste or crushed texture instantly. However, cleaning it can be annoying because the garlic skin gets stuck, and you end up touching the garlic a lot trying to scrape it out.

Go for a Manual Chopper If:

  • You measure garlic with your heart. If you’re cooking for a crowd and using a good amount of garlic, like half a head for one dish, a garlic press just slows things down.
  • You absolutely despise the odor. The chopper is a sealed system. The natural oils end up in the cup, not on your body.
  • You want texture. Sometimes you just want those little pieces of garlic sizzling in oil, not some watery garlic paste that’s going to burn up right away.

The Bottom Line

If you’re really aiming for no more sticky hands, the manual garlic chopper is definitely the top pick.

It’s real simple: the cup traps all the mess, so you can just drop the garlic right into your pot without getting those sticky, smelly bits on your fingers. Your family and your nose will be pretty happy about this.

Ourokhome Mandoline Slicer Review: The 6-in-1 Mess Killer?

Slicing vegetables usually involves a lot of chasing. You slice a cucumber, the rounds roll off the cutting board, fall onto the floor, and now you are washing them off while your dog looks disappointed.

  • An innovative mandolin slicer that will make you addicted to chopping: It is equipped with 6 interchangeable razor-sharp…
  • The vegetable shredder significantly enhances your efficiency in daily life: The 6 interchangeable blades of the veggie …
  • Multifunctional vegetable slicer & shredder: The potato slicer is equipped with a 2 mm slicing blade and a 4 mm slicing …

If you hate the mess of prep work as much as the slicing itself, the Ourokhome 6-in-1 Mandoline Slicer might be the smartest $20 you spend this year.

Unlike the handheld OXO or the heavy-duty Gramercy, this unit is designed as a complete “system.” It slices, grates, shreds, and crucially catches everything in a tidy box.

With a 4.5-star rating and over 3,000 units sold recently, it’s clearly hitting a sweet spot for home cooks. But is a plastic box with six different blades actually useful, or is it just clutter waiting to happen?

The “No-Mess” Container Design

The biggest selling point here isn’t just the blade; it’s the box.

  • The Catch Tray: The slicer snaps onto a clear food container. As you slice, every piece falls directly into the box. No stray carrots on the counter.
  • The Scale: A nice hidden detail is that the container has measurement markings on the side. If a recipe calls for “2 cups of shredded zucchini,” you don’t need a separate measuring cup. You just slice until you hit the line.
  • Stability: Because the slicer is locked onto the box, and the box has non-slip feet, it feels much safer than balancing a handheld slicer over a wobbling bowl.

6 Blades: A Jack of All Trades?

Most mandolines just slice. This one tries to do everything. It comes with 6 interchangeable stainless steel blades:

  1. Slicers (2mm & 4mm): For your standard cucumbers and potatoes.
  2. Waffle Blade: This is the fun one. It makes those textured waffle fries that kids love.
  3. Graters & Shredders: Coarse grating for cheese, shredding for hash browns, and a mashing blade for garlic/ginger.

Real User Experience:

Users love the versatility. Being able to switch from slicing onions for a burger to grating cheese for the topping without dirtying another tool is a huge win. The waffle cutter specifically gets a lot of praise for making homemade chips look store-bought.

Safety and Cleaning

The Ourokhome takes safety seriously, which makes sense since it appeals to beginners.

  • The Guard: It comes with an “expanded” hand protector. You spike your veggie onto it and slide. It keeps your fingers far away from the action.
  • Storage: Dealing with 6 loose, razor-sharp blades sounds like a nightmare, but Ourokhome includes a blade storage box. Everything tucks away neatly so you don’t accidentally cut yourself reaching into a drawer.
  • Cleanup: The blades are top-rack dishwasher safe. However, the waffle blade can trap food bits. The kit includes a little cleaning brush to scrub those crevices—definitely use it.

Pros and Cons

ProsCons
Mess-Free: Catch container keeps counters clean.Plastic Build: Feels less “pro” than steel models.
Variety: 6 blades (including Waffle cut).Manual Swapping: You have to physically change blades.
Safety: Stable base + good hand guard.Storage: More parts to keep track of than a simple slicer.
Price: Excellent value (often under $20).

Is It Worth It?

If you are a professional chef, you might find the plastic construction a bit light. You would probably prefer the steel Gramercy.

But for a busy parent or a home cook who just wants to make a salad without destroying the kitchen, the Ourokhome 6-in-1 Slicer is fantastic. It replaces a grater, a shredder, and a slicer, all while keeping your counters spotless.

Buy It If:

  • You have kids who love waffle fries.
  • You hate cleaning up vegetable scraps from the floor.
  • You want one tool that does grating and slicing together.

Gramercy Adjustable Mandoline Review: Is Stainless Steel Worth the Upgrade?

If you have ever used a cheap, plastic vegetable slicer, you know that “wobbly” feeling. You push a potato through, the plastic flexes, the blade catches, and suddenly your heart skips a beat because you almost sliced your thumb.

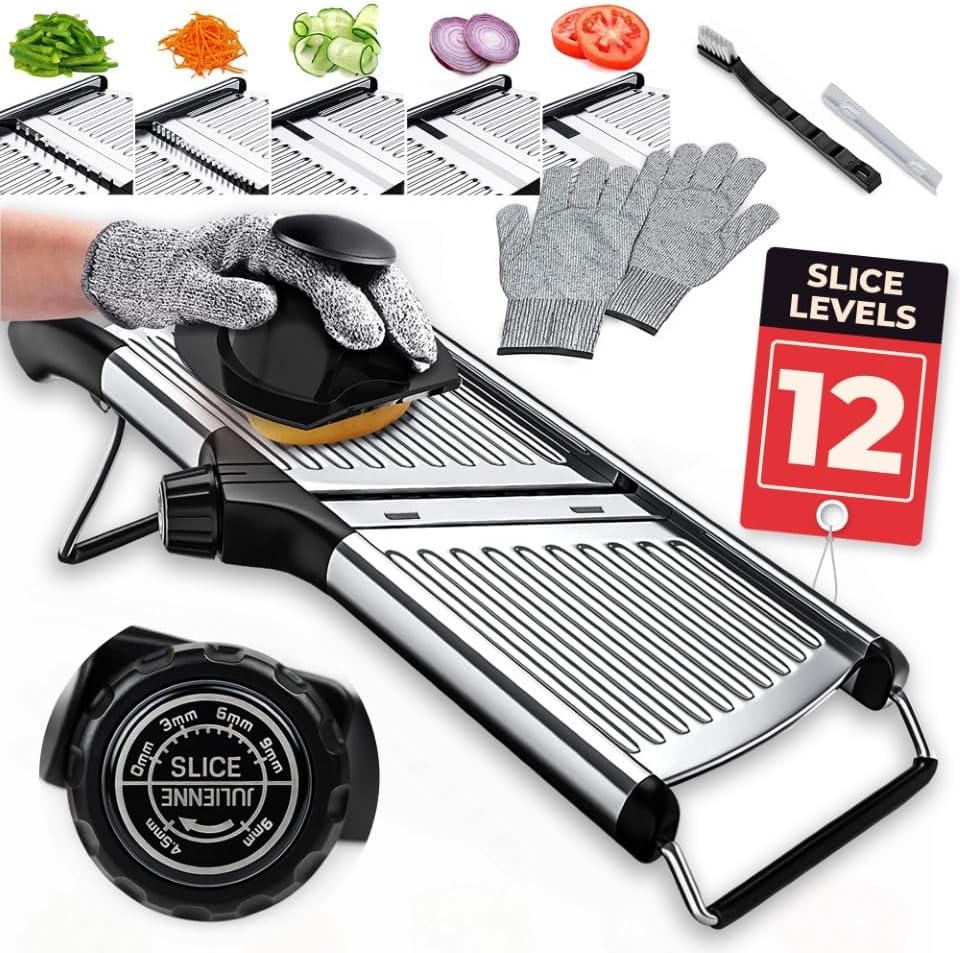
  • ADJUSTABLE PRO SLICER – MANDOLINE PRECISION MADE SIMPLE: An adjustable mandoline slicer (aka mandolin) with a built-in d…
  • ROTATING BLADE SYSTEM – SMOOTH AND EFFICIENT: The rotating blade cylinder shifts seamlessly between thickness settings. …
  • NON-SLIP BASE – BUILT FOR STABILITY AND CONTROL: This mandoline slicer for kitchen use stays firmly in place with anti-s…

That is exactly why people upgrade to the Gramercy Adjustable Mandoline Slicer.

It looks like something ripped straight out of a professional restaurant kitchen. It’s shiny, it’s metal, and it promises to be the last slicer you ever buy. But does a stainless steel body actually make slicing easier, or is it just for show?

We looked at how it holds up against piles of onions and potatoes to see if it earns its spot on your counter.

Built Like a Tank (Mostly)

The first thing you notice is that it doesn’t look like a toy. Most mandolines under $50 are flimsy plastic. The Gramercy is built with a stainless steel deck.

  • Why this matters: When you are slicing hard root vegetables like sweet potatoes or carrots, you need rigidity. If the slicer bends, your slices come out uneven. This metal deck stays flat.
  • The Dial System: This is the best design feature. On old-school mandolines, you had to physically pull out the sharp blade and swap it for a different one. With Gramercy, you just turn a black dial on the side. It switches from paper-thin slices to thick cuts (up to 9mm) or pops up the julienne teeth for fries. You never touch the blade.

Safety: They Actually Included Gloves

We have to give Gramercy massive credit here. Mandolines are statistically one of the most dangerous tools in a home kitchen.

Usually, you have to buy safety gear separately. This box comes with a pair of cut-resistant gloves right inside.

  • The Food Holder: It also comes with a plastic guard to hold the veggie, but let’s be honest sometimes those guards slip. Having the gloves as a backup is the difference between a quick dinner and a hospital trip.

Performance: The “8 Onion” Challenge

Does it actually save time?

User Boo left a review that sums it up perfectly. They compared it to a deli meat slicer and claimed they “cut 8 onions in about 3 minutes.”

That is the power of a wide, sharp blade. If you are prepping for a big holiday dinner or making a massive batch of French Onion Soup, this speed is unbeatable.

However, it is not magic.

  • The Stick Point: User Brady noted that sometimes “it just gets stuck or decides not to cut something.” This usually happens with softer produce, like overripe tomatoes or soft peppers. The blade is sharp, but manual slicing always requires a bit of momentum.

Cleaning and Maintenance

Since it’s stainless steel, you might worry about rust or cleanup.

  • The Good: It is listed as dishwasher safe. The blade cylinder pops out so you can rinse it separately.
  • The Bad: As one user pointed out, the blade itself isn’t easily removable for sharpening. It’s a fixed unit. While the steel is high quality (4CR15 grade), if it eventually goes dull after years of use, you can’t just whetstone it like a knife.

Pros and Cons

ProsCons
Safety: Includes cut-resistant gloves (huge value).Size: It’s bulky and takes up drawer space.
Speed: Flies through hard veggies like potatoes/onions.Soft Veggies: Can struggle with squishy produce.
Durability: Stainless steel frame doesn’t flex.Sharpening: Blades are not designed to be sharpened.
Convenience: Adjustable dial means no loose blades.

The Bottom Line

If you are just slicing one cucumber for a salad, this might be overkill. It’s big and takes a minute to set up.

But if you are a meal prepper, a canning enthusiast, or just have a large family to feed, the Gramercy Adjustable Mandoline is a fantastic investment. The fact that it comes with gloves makes it the safest “heavy-duty” option in this price range. It’s sturdy, fast, and feels professional.

Classic Meals

- Advertisement -