Zyliss Easy Pull Food Processor Review: The Ultimate Tool for Tiny Kitchens
If you live in a small apartment, own an RV, or just hate dragging out a heavy electric food processor for a single onion, you know the struggle. You want the speed of a machine but the convenience of a knife.
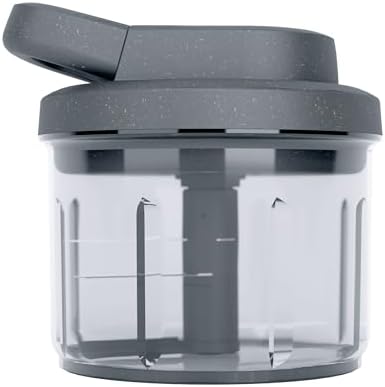
Enter the Zyliss Easy Pull Food Processor (3.0 Edition).
- Versatile Food Dicer: This Zyliss food chopper simplifies prep with efficient food chopping, blending and pureeing
- Kitchen Gadget with Swiss Blades: Dicer with high-grade serrated stainless steel ensures uniform dicing and slicing of t…
- Food Chopper with Adjustable Slicing: This manual food chopper features an easy-to-use slide lever that allows for preci…
With a 4.7-star rating from over 5,000 users and the coveted “Overall Pick” badge on Amazon, this Swiss-engineered gadget promises to replace your knife, blender, and electric chopper. But can a manual pull-cord device really handle tough nuts and frozen veggies without snapping?
We analyzed the design, the patented blade system, and years of long-term user feedback to see if this is the ultimate tiny kitchen hack.
The Mechanism: Swiss Engineering in Your Hand
Unlike cheap knock-offs that use a simple string, the Zyliss feels engineered.
- The Pull System: It works like a lawnmower starter but smoother. One pull rotates the dual blades multiple times.
- The “Sweeper” Arm: This is the secret weapon. Most manual choppers have a flaw: food gets stuck to the bottom or sides, and the blades spin in empty air. The Zyliss has a patented booster arm at the bottom that sweeps food back into the cutting zone. This ensures uniform chopping without you having to stop and shake the bowl.
What Can It Actually Chop?
We looked at real-world tests to see its limits.
1. The “Walnut Dust” Test
User ArtFirst has been using this machine for over 6 years (since 2017!) specifically to make organic walnut butter. They note: “3 pulls yields chopped nuts… 30 pulls yield a nice fine texture about like brown sugar.”
Analyst Note: If it can handle frozen walnuts for 6 years without the cord snapping, the build quality is exceptional.
2. The Ham Salad Test
User Kathleen C. Smith managed to chop a tough ham steak for salad. While you need to cut meat into chunks first, the fact that a manual plastic device can process meat without jamming is impressive.
3. The Salsa/Pesto Master
This is where it shines. For salsas, pestos, and guacamoles, it offers better texture control than an electric blender (which often turns salsa into soup). You stop pulling when you reach the chunkiness you want.
The Limitations (Read Before Buying)
It is not magic. User ArtFirst honestly pointed out a key limitation: Single-Dish Veggie Prep.
If you try to chop 6 different veggies at once for a skillet meal, the softer ones turn to mush before the harder ones are chopped.
- The Fix: Use it for sauces, dips, and single ingredients (like a batch of onions). Don’t try to make a whole ratatouille in one go.
Design & Maintenance
- Capacity: 25 Ounces (approx. 3 cups). Perfect for a family of 2-4.
- Cleaning: The bowl and blades are dishwasher safe.
- Warning: The lid contains the pull mechanism. While the manual says “dishwasher safe,” savvy users recommend hand-washing the lid with a sponge. Getting water inside the pull-cord housing can eventually cause the string to mold or weaken.
Pros and Cons
| Pros | Cons |
| Durability: Users report 6+ years of daily use. | Lid Care: Pull mechanism shouldn’t be submerged in water. |
| Efficiency: Patented sweeper arm prevents stuck food. | Uneven Mix: Can’t chop hard & soft veggies together perfectly. |
| Portability: No electricity needed (Great for Camping/RVs). | Manual Effort: Requires arm strength for tough items. |
| Versatility: Handles nuts, meat, bread, and veggies. |
Final Verdict
The Zyliss Easy Pull Food Chopper is not just a gadget; it’s a serious tool.
It bridges the gap between a chef’s knife (too slow) and a Magimix (too big). For chopping onions without tears, making quick guacamole, or processing nuts, it is unbeaten in its class.
Buy It If:
- You have a tiny kitchen or go camping often.
- You want a durable tool that won’t break after a month (proven 6-year lifespan).
- You hate the noise and cleanup of electric processors.
Skip It If:
- You want to slice cucumbers (get a mandoline instead).
- You need to puree large batches of soup (get an immersion blender).


")
