Determining a good, reliable chef’s knife that doesn’t break the bank involves trade-offs between steel quality, handle ergonomics, and overall durability. Our full review focuses on the highest performing models under $70 to show that professional-level cutting precision is achievable without committing to a four-figure budget.
We have studied construction and edge geometry with meticulous care and scrutinized user feedback to provide the top 10 value-oriented workhorses your home kitchen cannot afford to be without if efficiency and sharpness are your top priorities.
Our Top 10 Budget Chef’s Knives: Performance Under $70
1. Victorinox Fibrox Pro 8-Inch Chef’s Knife
This 8-inch chef’s knife has high-carbon stainless steel stamped construction and is often cited by culinary professionals as the best entry-level choice. Its high point is excellent initial sharpness and ease of maintenance, but the real star of the show here is its patented Fibrox handle a non-slip, ergonomic grip that reduces hand fatigue, especially during extended prep sessions. It’s an ideal workhorse that happens to also be NSF certified for sanitary food handling.
- An excellent choice for butcher work, this breaking knife was made to easily break down meat into smaller roasts and pie…
- A superior and lightweight Swiss made knife with a high-carbon stainless steel edge. Easy to clean, extremely sharp and …
- Contemporary, textured handle with a non-slip grip — even when wet. The handle is ergonomically designed to help minimi…
2. Matsato Chef Knife – Japanese Style
This Japanese-style chef’s knife offers a unique aesthetic and performance profile that often appeals to those who prefer the geometry of a Santoku or Gyuto over traditional Western shapes. While details vary, this knife has generally featured a high-carbon stainless steel blade designed for thin, precise slicing and chopping. Its balanced design puts an emphasis on control a key characteristic for cooks who favor a vertical chopping motion rather than the Western rocking technique.
- Chef knife for every kitchen | Whether you are a home cook or a professional chef, every kitchen needs a Matsato knife. …
- Well-balanced craftsmanship | solid oak handle crafted from premium quality materials. The Matsato Kitchen knife makes c…
- Chef knives | The Matsato Japanese Steel kitchen knife was hand-crafted using traditional styling and techniques. By com…
3. COKUMA 3-Piece Kitchen Knife Set (B09NW1J2NW)
Falling into the ultra-budget category, this set includes an 8-inch chef’s knife, a utility knife, and a paring knife all in one purchase targeting maximum value and utility. The knives themselves are made from high-quality German stainless steel, with a full-tang construction secured by three rivets in the ergonomic plastic handle to provide strength with a comfortable grip suitable for everyday household use.
- 1. Cokuma Advantage: Combined with the Modern Garden-Style Workshops and innovation design, Cokuma is expanding worldwid…
- 2. Kitchen Knife Set Includes: 8 Inch Chef Knife, 4.5 Inch Utility, 4 Inch Paring Knife and three matching knife sheath….
- 3. German High Quality Steel: Precision-forged from imported premium quality, high-carbon German steel-3CR13MOV. which i…
4. Amazon Basics Classic 8-Inch Chef Knife
The Amazon Basics model represents the quintessential entry-level, no-frills chef’s knife that appeals specifically to the beginner or college student setting up a first kitchen. Its design follows the classic triple-rivet aesthetic, with an ergonomic handle and full-tang, high-carbon stainless steel blade that offers enough weight and balance for basic chopping and slicing tasks at an exceptionally low price point.
- This 8- inch chef’s knife is a versatile tool for cutting, chopping, dicing, mincing and more
- High carbon stainless steel blade with a satin finish that is stain, rust and pit resistant
- Forged stainless steel construction with a full tang, 8” blade and three rivets
5. Brewin CHEFILOSOPHI Chef Knife
The CHEFILOSOPHI chef knife represents an aesthetic step up in the budget category, thanks to its striking Pakkawood handle—known for its moisture resistance and rich, laminated appearance. The blade itself is forged from German high-carbon stainless steel, providing good edge retention and durability. That makes this knife an attractive choice for professionals who want a professional appearance and comfortable, full-tang weight distribution without paying a premium price.
- DESIGN PHILOSOPHY – The Chefilosophi Series professional kitchen knife set from Brewin combines cutting edge kitchen tec…
- RAZOR SHARP WITH DURABILITY – This stainless steel knife set features rock solid design crafted from durable materials; …
- PREMIUM QUALITY – Each chef knife set has undergone stringent quality inspection and hundreds of hours of development wi…
6. HENCKELS Solution 4-Inch Paring Knife
Though specifically a paring knife, its inclusion represents the need for quality forged steel in auxiliary tools within a budget. This HENCKELS Solution knife is precision-stamped from single pieces of high-quality stainless steel with a lightweight, ergonomic polymer handle. Its design emphasizes maneuverability and control for delicate tasks like peeling, coring, and trimming, offering Henckels’s known quality in a small, essential form factor.
- ULTRA-SHARP BLADES: Superior professional-level sharpness that ensures precision cutting.
- THE LAST KNIFE YOU’LL EVER NEED TO BUY: German Engineered Knife Informed by over 100 Years of Mastery. HENCKELS knives a…
- EFFORTLESS CUTTING: Enjoy easy meal prep and paper-thin cuts with minimal effort with this lightweight, easy-to-use knif…
7. Cooks Standard 8-Inch Chef’s Knife
This 8-inch chef’s knife boasts a robust blade of German high-carbon stainless steel and attention to a balanced, ergonomic feel. The knife features a synthetic ergonomic handle attached to a full tang for extra stability and safety in hard use. Its overall construction delivers a reliable, well-weighted feel suitable for cooks who prefer a standard Western blade profile with strong heel support.
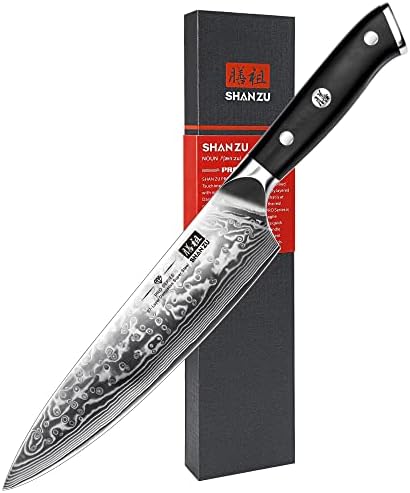
8. SHAN ZU Damascus Chef Knife
Representing the premium end of this under-$70 class, this knife boasts a striking 67-layer Damascus pattern over its high-carbon stainless steel core, combining the best of both worlds: great looks and great performance. The elaborate construction provides supreme sharpness and resistance to discoloration, while its ergonomic G10 handle ensures a secure and moisture-resistant grip, making it an outstanding investment for cooks seeking premium looks combined with functional artistry.
- Japanese Steel Knife Core, Super Sharp: SHAN ZU chef’s knife core is made of 10Cr15Mov Damascus Japanese steel that has …
- REAL Damascus Knife, not Lazer Etched: SHAN ZU Damascus chef knife layering sheets of carbon steel, and applies excessiv…
- A total of 67 Layers Steel, Long-Lasting Use: SHAN ZU Damascus chef knife forged by 67 layer sheets of steel greatly enh…
9. MOSFiATA 8-inch Chef’s Knife
The MOSFiATA model is one of utility, basically, since it has a high-carbon stainless steel blade, and many retailers sell it with extras such as a finger guard in the gift box, even including a sharpener. Its construction is solid, with an ergonomic Micarta handle, known for durability and comfort in grip, hence being very user-friendly. This knife will balance the sharpness, comfort, and additional value well, catering well to the enthusiastic home chef.
- 【High Carbon German Stainless Steel Laser-engraved Pattern(Not Damascus Pattern )】 MOSFiATA 8 inch pro chef’s knife is m…
- 【Razor Sharp Edge & Anti-Corrosion, Anti-Tarnish Blade】Processed with the unique polishing technology and hand sharpened…
- 【Full Tang Construction & Ergonomic Design】 MOSFiATA ergonomic knife handle is made of santoprene for comfort and polypr…
10. Victorinox Fibrox 10-Inch Curved Breaking Knife
Although this Victorinox is technically a breaking/cimeter knife, this knife is sometimes utilized as a heavy-duty chef’s knife for large cuts of protein, capturing the brand’s ethos on usefulness. Similar to the 8-inch version, it includes the no-slip Fibrox handle and durable, curved stainless steel blade for long, smooth cuts. Larger and with a profile more curved than others, it’s ideal for breaking down bigger vegetables or taking care of serious food quantities, adding versatility to a budget kitchen.
- For home chefs & professionals. This Fibro Pro chef’s knife has been the top choice of both home chefs and professionals…
- Fit for all tasks. Designed to handle kitchen tasks both big and small, This durable knife’s razor sharp and laser-teste…
- Easy handling. Each knife features an ergonomic handle made from thermoplastic Elastomer (TPE) for a non-slip grip – eve…
Conclusion: Value That Lasts
The competition is brutal, and chef’s knives under $70 must wrestle with the best of them; still, these ten models will prove that professional quality, balance, and durability can be available for any home cook. Investing in any one of these budget champions is the best way to improve your culinary skill without affecting your budget.


")

